Ultimaker released version 4.9 of Ultimaker Cura.
The popular 3D print management software tool is used for not only Ultimaker 3D printers, but also for a number of third parties that have configurations within the tool, or have added their own after the fact.
Ultimaker releases Ultimaker Cura as an open source tool, so it’s often used as a base for speciality slicing software.
Combined, these factors make Ultimaker Cura one of the most popular, if not the most popular tool for preparing 3D print jobs.
The company produces new versions of the software on a regular basis for many years, and the most recent release is version 4.9.
This release is largely focused around Ultimaker’s cloud ecosystem, the Digital Factory. The cloud system permits users to store and share 3D print files, making more efficient and effective use of the technology within workgroups.
The main new feature of Ultimaker Cura 4.9 is the integration of the Digital Library, part of the cloud system. Now directly from Ultimaker Cura users can pull files from the Digital Library for slicing or execution on an Ultimaker 3D printer. It’s also possible to load a model, slice it, and then store he resulting GCODE back into the Digital Library, all within Ultimaker Cura.
That feature is useful for Ultimaker operators only, but there were also several minor feature updates in the software that are applicable for anyone, including those using the software to manage third party 3D printers. By the way, Ultimaker added support for another 18 third party 3D printers in this release.
Let’s take a look at the new features.
One of the subtle new features is a change to the calculation of print weight. The calculation now includes decimal points. While this may not seem particularly useful, especially if your 3D print is in the 500+g range, it is actually useful for those 3D printing smaller objects.
Some 3D printers now have exceptional resolution, and operators do leverage that capability to produce rather small objects. By including the weight in decimals, these operators will be better able to track how much material they may use when larger quantities of the small object are produced.
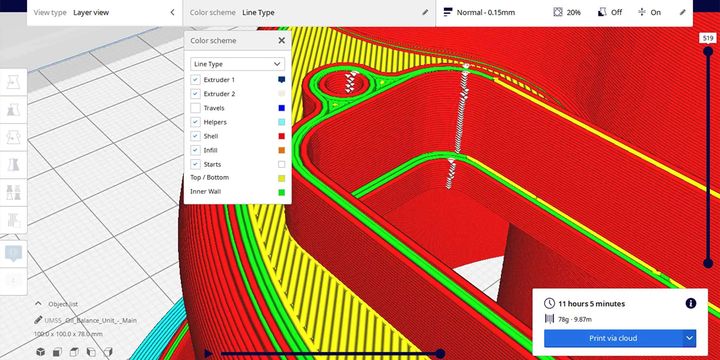
Ultimaker has also tweaked the preview mode to “line type”, which is a minor, but highly desired change. Almost everyone would change the default view to line type in order to properly see the nature of the generated GCODE, and now the software uses this mode by default. It’s good to see Ultimaker listening to user feedback.
Finally, they’ve made the Z-seam highly visible in preview mode. The “seam” is the point at which the extrusions start and stop on each layer. Usually these line up vertically, and produce a vertical “seam” on 3D prints. Depending on the nature of the application, it may be desirable to relocate the seam to another location to preserve surface quality, or even randomize its location on each layer. Now this process is much easier because you can see the seam at a glance. (See image at top for an example and count the seconds until you see the seam.)
Nice work, Ultimaker!
Via Ultimaker
