Researchers have developed an approach for measuring 3D printed part quality over multiple machines.
Making production parts on 3D printers using additive manufacturing techniques is still a relatively new thing; it’s only been a short while since materials were introduced that attracted industry to the concept. Still today there are countless manufacturers that have not yet adopted additive manufacturing.
While prototyping has long been the prime application for 3D printers, the rigor required for the production of end-use parts is vastly greater. SpaceX chief Elon Musk recently said:
“Production is hard, prototypes are easy.”
He could not be more correct, and that statement applies to our world, too.
The main issue with production is to not only achieve a certain level of part quality, but to ensure it is achieved for each and every part that’s produced. And that could mean thousands or millions of parts.
That’s hard.
One way to overcome this barrier is to include quality measurement systems within 3D printers, some running in real time. These allow the machine to occasionally correct things on the fly, while at other times it permits an early, but unsuccessful, conclusion to the print job.
There’s been plenty of research on AM part quality, but most of this research focuses on parts from a specific machine used by the researchers.
While such research is useful, those using AM for larger-scale production may find it wanting. That’s because in order to meet the production requirements they almost certainly will be operating a farm of 3D printers. The ability to add more equipment allows more parallel production, and that’s the only way to speed up the relatively slow process of running a 3D print job.
How can these operations measure quality ACROSS all the machines they’re using? That’s what the new research from the University of Illinois Urbana-Champaign has investigated.
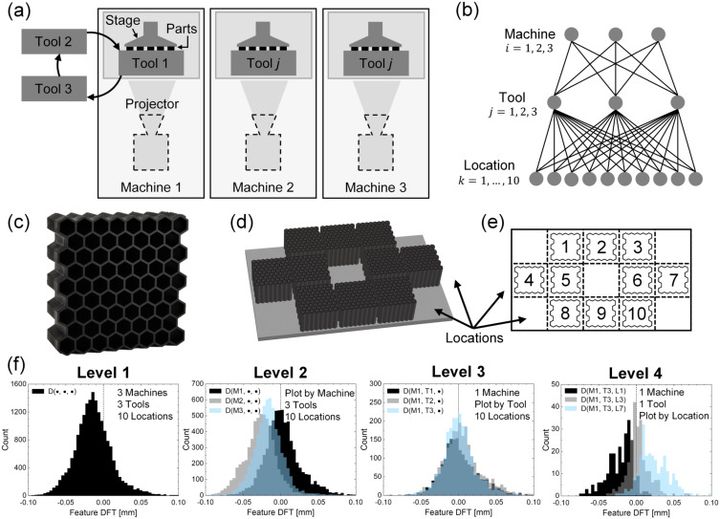
They obtained three Carbon M2 units and performed a series of 90 “identical” part prints on each. They then performed a series of measurements of the type a manufacturer would perform on the parts to determine variations between prints done on different but identical machines.
This data underwent statistical analysis to see if any correlations were present. The results were quite interesting, as they found the variations definitely did correspond with process parameters. They explain:
“Geometric defects in the wall thickness depend upon machine and location within the build but do not depend on the hardware tool, while geometric defects in the wall length and height of the part depend upon machine and tool but not location. The uniformity within the parts, measured by standard deviations of the individual features within a part, mostly depends upon unmeasured parameters.”
While these results were prepared using a set of Carbon M2 3D printers, it’s clear similar analyses could be done with other machines. Presumably similar findings would be present.
These conclusions are quite intriguing, and could lead to the development of more advanced factory AM software that would be better able to control vast farms of 3D printers to produce consistent part quality.
Of course, this is just research at this stage, but it seems to me these findings could clearly lead into a very interesting and powerful commercial software tool for industry.
Via Science Direct
