
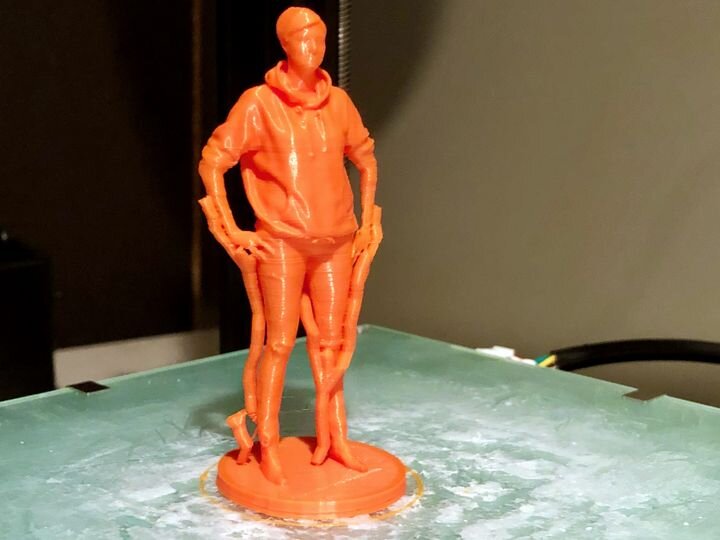
![Problematic 3D print — can you see the issue? [Source: Fabbaloo]](https://fabbaloo.com/wp-content/uploads/2020/05/tippy-1_img_5eb08b8d2b842.jpg)
I found an unusual 3D printing support structure issue I hadn’t seen previously.
I was 3D printing a 3D body scan of a friend and noticed something unusual in the print: the right arm was out of place at the elbow, and I wondered what had happened.
When I take a 3D scan of a person, I try hard to ensure the pose will result in a 3D model that doesn’t require support structures. Yes, support structures are handy when there are difficult geometries, but they are also a pain to remove and often leave unsightly marks on the main body that have to be sanded out. For me, it’s better to avoid them if at all possible.
That was the case here: I had the subject pose with hands on hips to ensure a smooth transition and lack of overhangs. 3D body scans typically end up with tiny dangling fingers that are problematic to 3D scan, 3D model and 3D print. Another typical pose issue is the chin, and I have subjects tip their head upwards ever-so-slightly to avoid overhangs. In this case the pose did both of those maneuvers, leading to a support-free 3D model.
But somehow it did not 3D print correctly.
![Problematic areas on a 3D print [Source: Fabbaloo]](https://fabbaloo.com/wp-content/uploads/2020/05/image-asset_img_5eb08b8d75278.jpg)
I quickly realized what happened. This 3D model is quite small, only 100mm in height, and thus the arms and legs don’t have a lot of thickness to them. If you imagine the layer-by-layer progress of the 3D print process, you can visualize a partially-produced arm being supported only by a couple of tiny fingers.
This lack of strong attachment freed the partial arm to swing back and forth as the nozzle brushed against it. Eventually things stabilized and the print continued, but at that point the arm was slightly out of position.
While this incident occurred on an FFF 3D printer, it could easily be duplicated on a resin 3D printer if 3D printed in the same orientation. Long structures aren’t properly supported by thin attachment points.
If that’s what happened, how can this be avoided?
One way would be to inspect the 3D model by eye and attempt to identify any instances of this scenario. If you have some, then it’s a good idea to deal with them.
But how? In this case there was no extreme overhang angle that would cause a 3D print slicing program to generate supports in that area. The answer is to manually add supports.
I’m using Autodesk’s popular Meshmixer utility for this purpose, as it includes a way to manually add “tree” supports to a 3D model.
However, Meshmixer immediately runs into the same problem: there is no overhang angle large enough to warrant automatic generation of support. Instead you must add them manually.
![Adding manual tree supports to figurine using Meshmixer [Source: Fabbaloo]](https://fabbaloo.com/wp-content/uploads/2020/05/tippy-manual-support_img_5eb08b8daf0e3.jpg)
Above you can see what I did. In Meshmixer you can go into the Analysis > Overhangs section and there you are allowed to add support structures by merely clicking on the “overhang” area and dragging down to the print plate. You can also add structures to the growing support tree itself, rather than the print plate.
There is a trick to this, however: normally, Meshmixer doesn’t seem to allow you to add tree supports except where it connects a detected overhang area to the print plate, or from an overhang area to an existing support.
The trick is to hold the shift key down when drawing the support branch. This overrides any thinking done by Meshmixer, and you don’t need that for this unusual support scenario. Thus you can quickly draw a number of appropriate supports to stabilize the region during 3D printing.
![Adding automatic tree supports to figurine using Meshmixer [Source: Fabbaloo]](https://fabbaloo.com/wp-content/uploads/2020/05/image-asset_img_5eb08b8dec587.jpg)
Another approach is to slide the threshold angle way too high, and then generate supports automatically. You’ll end up with far too many tree supports, but Meshmixer allows you to remove any by control-clicking on them. Thus you need only prune down your supports to arrive at the ones you truly require, as shown here. It’s probably best to experiment with the support generation to ensure you end up with an optimum support configuration.
![Correctly 3D printed figurine using Meshmixer tree supports [Source: Fabbaloo]](https://fabbaloo.com/wp-content/uploads/2020/05/image-asset_img_5eb08b8e3e485.jpg)
After exporting from Meshmixer, you slice and 3D print the 3D model directly, as there is no need for generating even more support structures in the slicing program.
This is a scenario you may occasionally encounter, but again it’s best to avoid them if at all possible. Perhaps I should 3D scan only large, thick people?
Via Meshmixer