
Our look at the Anycubic Photon Mono M7 Pro resin 3D printer concludes with print results and final thoughts.
This is part four of a four part series, please read parts one, two and three.
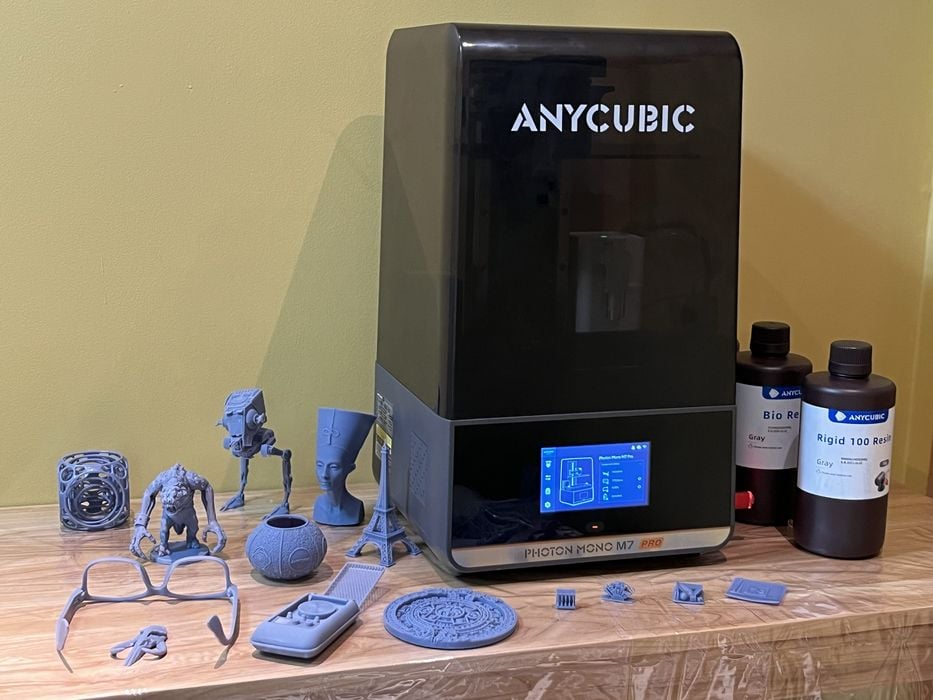
Anycubic Photon Mono M7 Pro Print Results
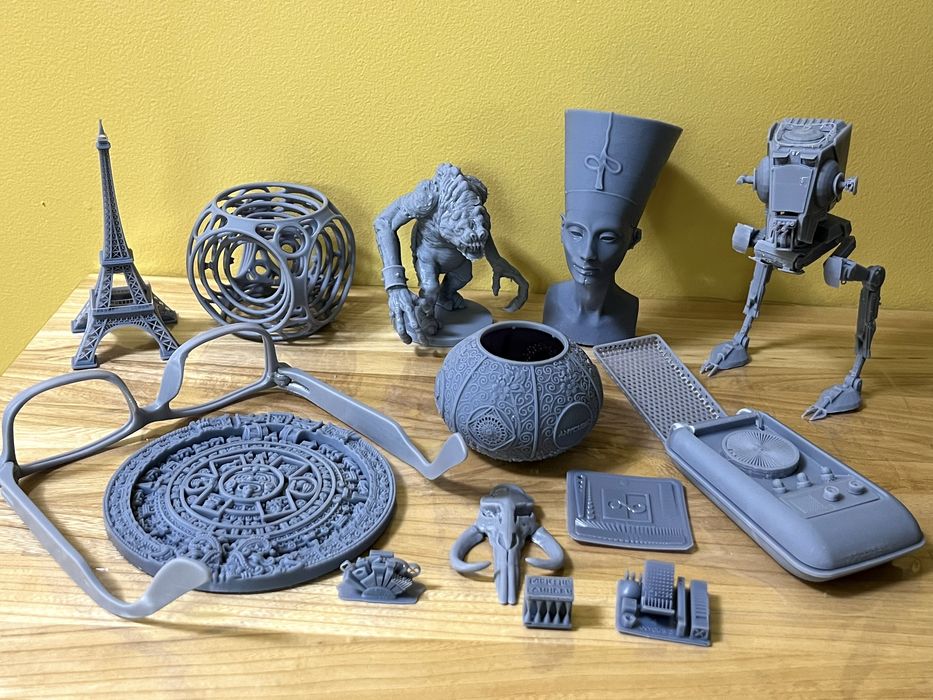
The Eiffel Tower is a model with challenging geometry that doesn’t require support and printed directly on the build platform. The estimated print time for the sliced file was 00:53:21 using 10.421ml of resin, with an actual print time 01:05:24.
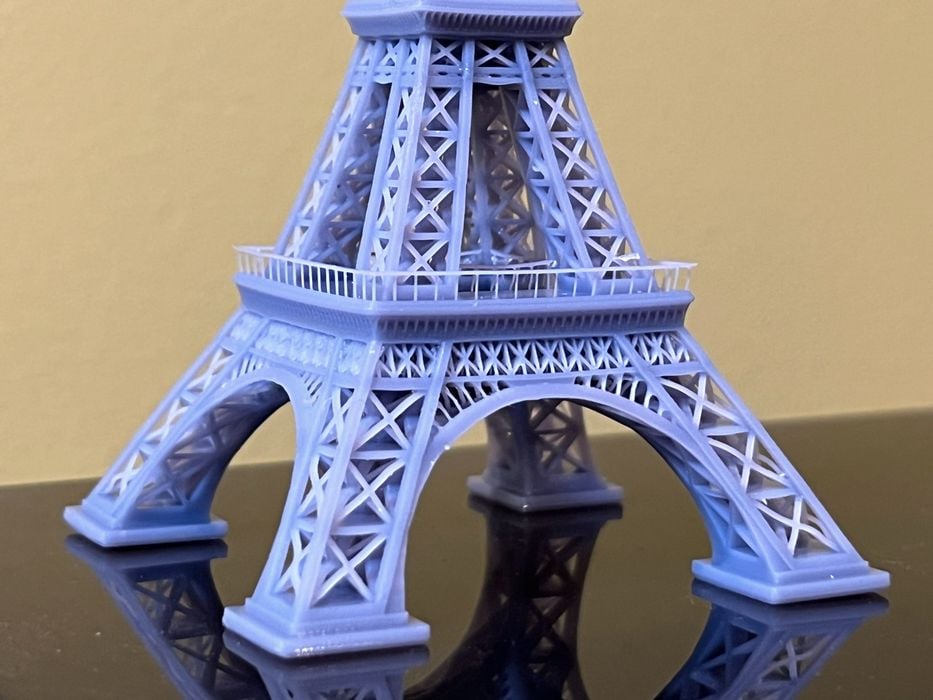
The print quality was excellent, especially considering that it took a little over an hour to generate and that our previous review of the M5S Pro took 07:28:00 using standard resin. Even the very thin handrail detail printed, with just some minor distortion noted to some of the thinner X structure higher up in the print, no doubt due to the aggressiveness of the super high speed printing.
It was time to print a larger object that required supports. We hollowed the Nefertiti model, making sure to punch some drain holes in the base as well as the ears to avoid any problems during print and to make rinsing the inside a breeze.
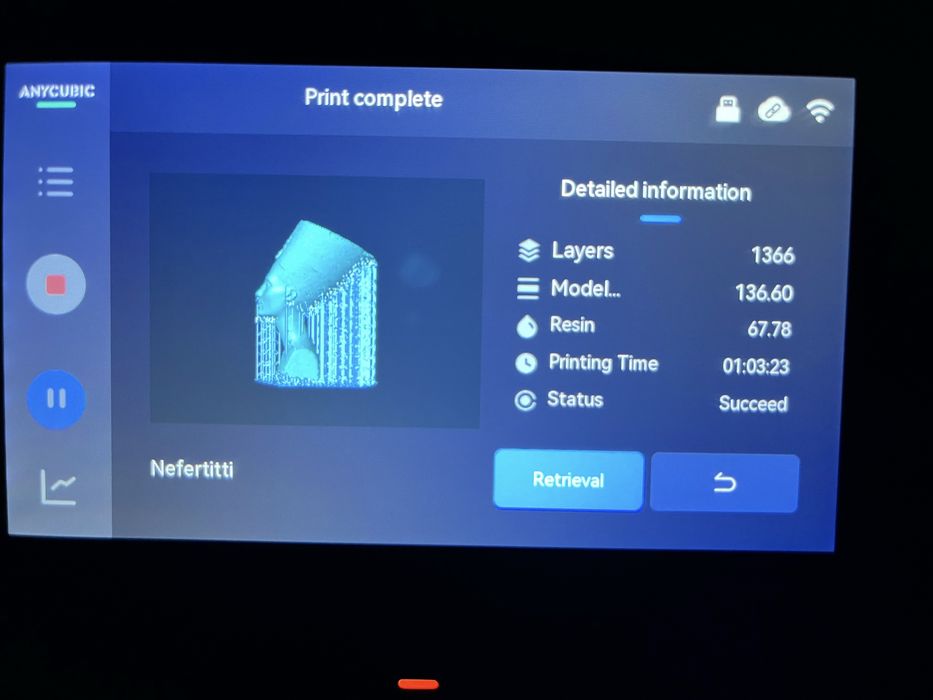
We sliced the model, getting an estimated build time of 01:00:11, using 81.955ml of resin and an actual print time of 01:03:23. It seems the actual print time is always a bit longer than the estimated duration.
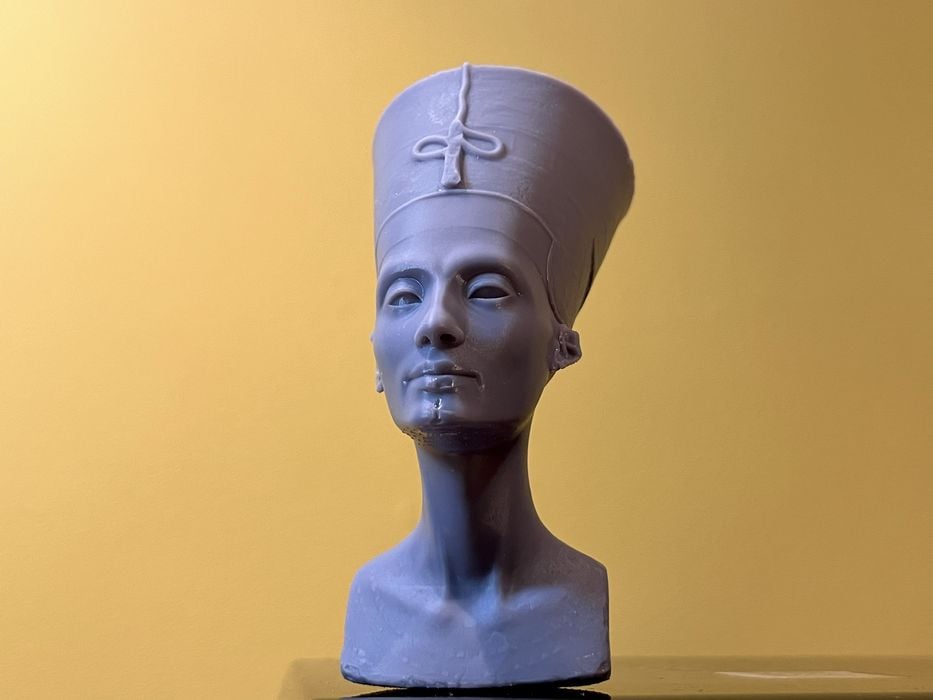
The support structure had no obvious issues and the surface quality of the model looked great, but when we removed the supports, we noticed something we hadn’t caught in the slicer: One of the sides of a support column had embedded itself into the chin of the model.
We went back to the slicer to check and sure enough, the collision was there. We also observed that the base of the model was slightly warped. It had been a bit of a challenge to peel at high-speed, most likely due to the addition of the large drain holes which would have weakened the surface a bit. We decided to tilt the model a bit more and regenerate the auto supports to see if we would get any better results, but then found that printed models’ quality now suffered from layer separation due to lack of internal supports in some areas. Resin 3D printing can be quite tricky!
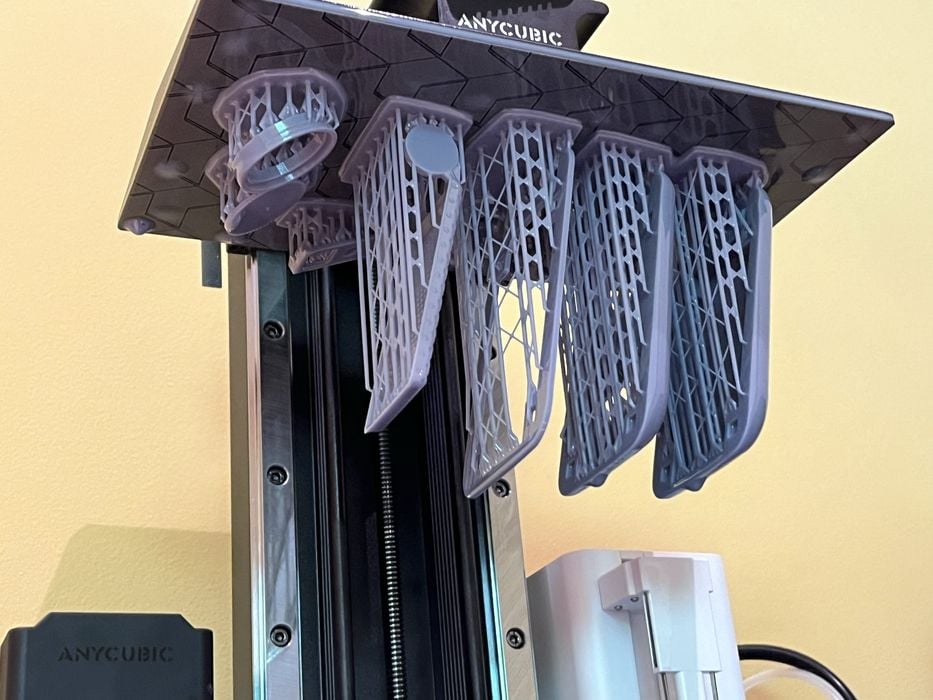
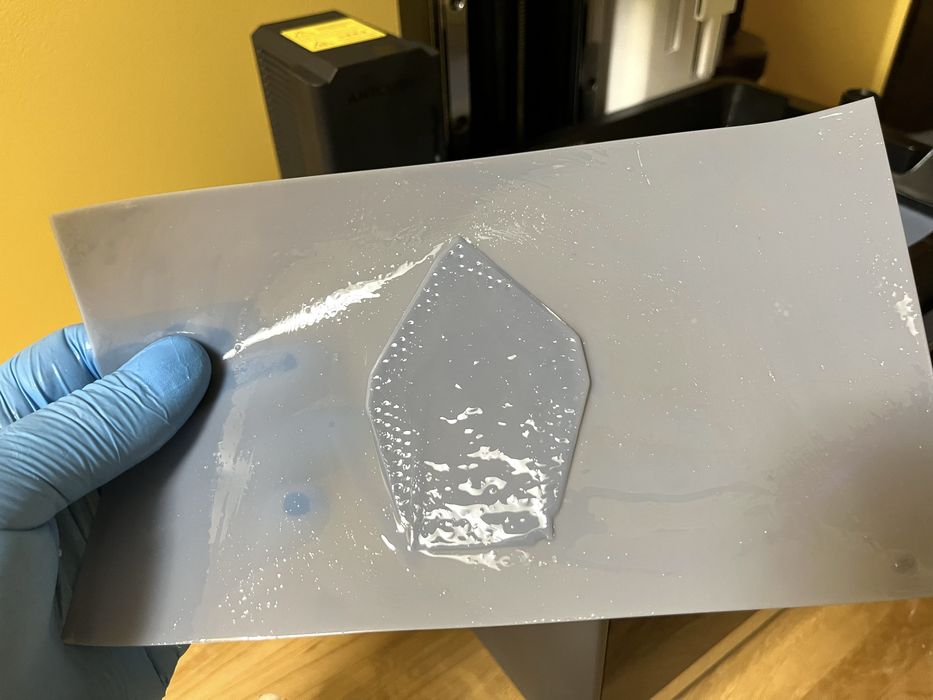
We next sliced the highly detailed Aztec Calendar Wheel 3D model using manual supports, adding them around the circumference and some in the center to help with the weight of the model, only to find that the support columns were not interconnecting to each other with cross-sections. This can weaken the support structures overall.
The adding of manual supports in Photon Workshop is not fully interactive and you do not get to adjust the support structure itself, just the placement of upper tips. We looked through settings and eventually found the correct one to change and switched “cross type” to “border method”.
This time when we generated our supports, the support columns were interconnected and not free standing.
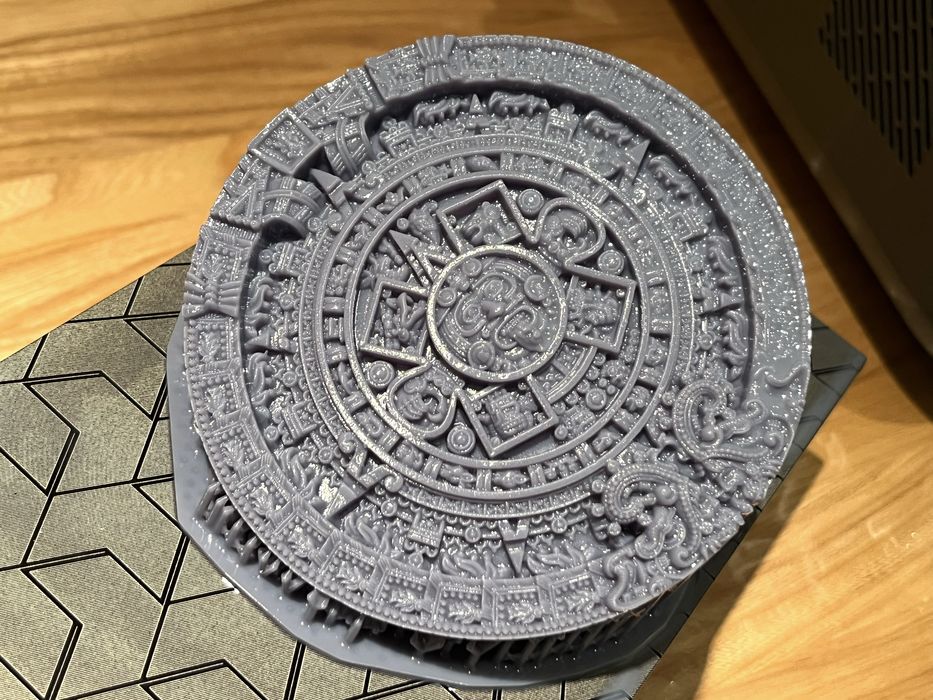
We sliced the model, getting an estimated time of 00:30:44, using 87.648ml of resin. The print completed in 00:35:45 and had very good surface quality, but a small bit of distortion was visible on the leading edge of the model where we should have had a few more supports.
Slicing a model manually for high-speed resin versus standard speed resin requires a bit more attention to support placement and quantity, given the aggressiveness of high-speed printing. (We also got a visual reminder to make sure the print was thoroughly dry before putting in the cure station, otherwise a white layer of sediment would be permanently cured onto the model!)
We decided to reprint the model using auto support and compare results. The estimated print times were basically the same, but the volume of resin jumped to 132.201 ML of resin –– auto supports were using a substantially larger amount of extra resin. The print completed in 00:36:15 and looked fantastic. Admittedly, we had gone for the least amount of supports in our manual print and to be fair we should have used a few more at the base of the print.
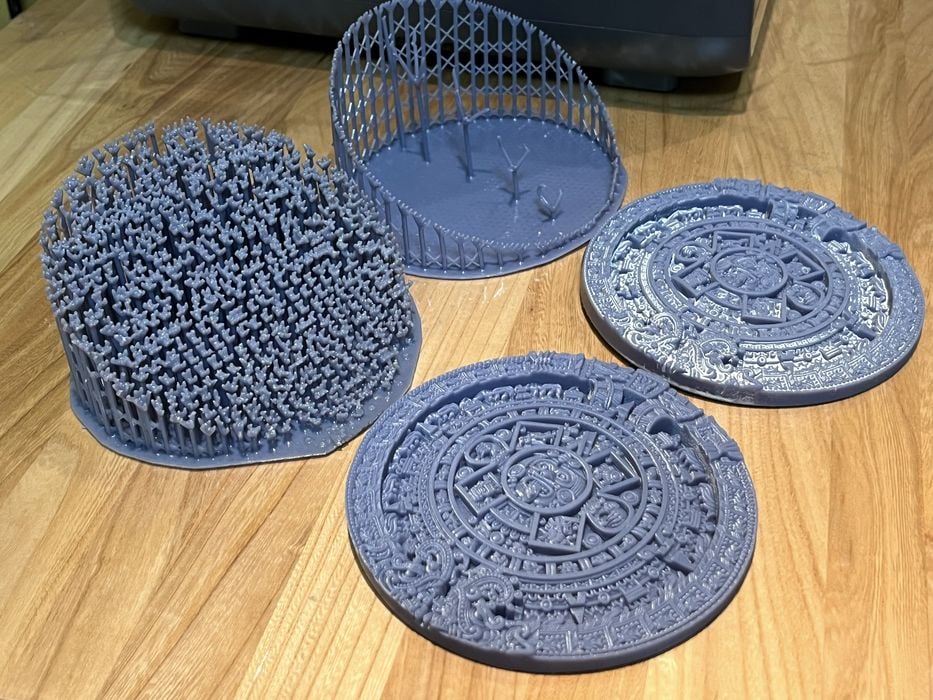
But in a side-by-side comparison, the difference in the amount of auto supports to achieve the same print was dramatic.
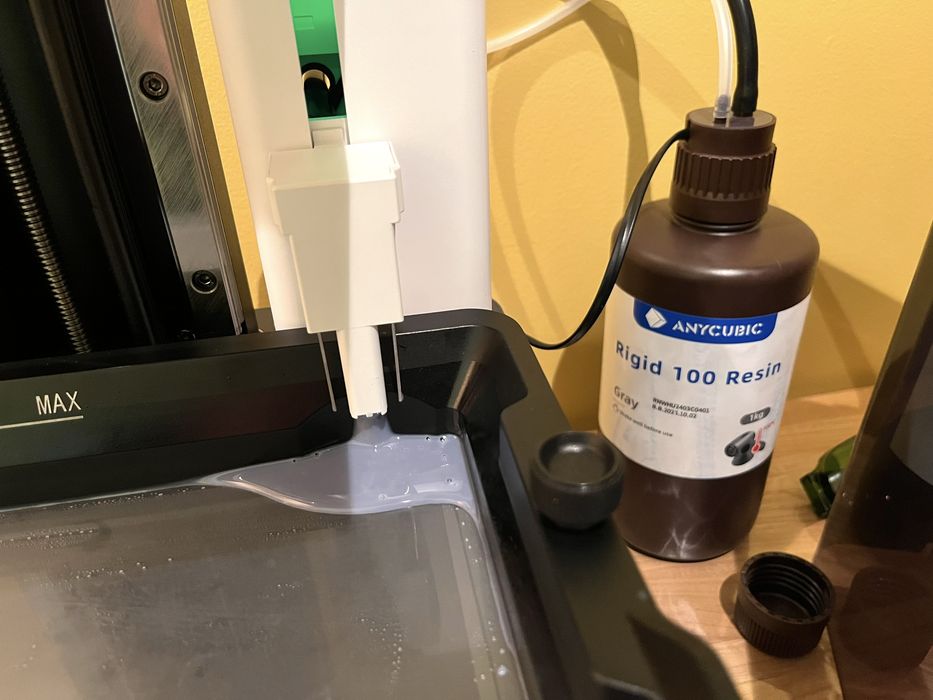
Now that we were running low on high speed resin, it was time to switch over to the Rigid 100 Resin that Anycubic had supplied. We double checked the printed and digital manuals for the printer and found no reference material for what we should be doing when switching to a different resin type, as there would certainly be some trapped resin in the circulation system and auto fill piping.
We checked the Anycubic website and found some information on the Wiki, which said:
“Under normal circumstances, the small amount of residual resin (regular resin <=10ml) in the automatic, discharging module after automatic discharging will not significantly affect subsequent resin replacements.”
They did however suggest that if you’re using transparent resin to put some alcohol in the empty tank and discharge it into an empty bottle to help remove the extra resin. Considering that the High Speed, Rigid 100, and Bio resins that Anycubic supplied were all gray, we decided that we would skip this extra cleaning ste.
We shook up the bottle of Rigid 100 resin and did a quick swap with the feeder cap. While we were waiting for the printer to fill with resin, we prepared to sliced up another model. But wait, we first needed to calibrate the resin all over again! Correct print parameters can differ quite significantly between resins.
Anycubic’s website strangely had no listing for the Rigid 100 resin, so we created our own profile and decided to start testing exposure rates using normal printing mode at 0.05mm layer height, and what looked like common 1.8 second exposure time for the majority of the Anycubic resins. We increased the bottom exposure time to 35 seconds, as the resin seemed to be much thicker in consistency.
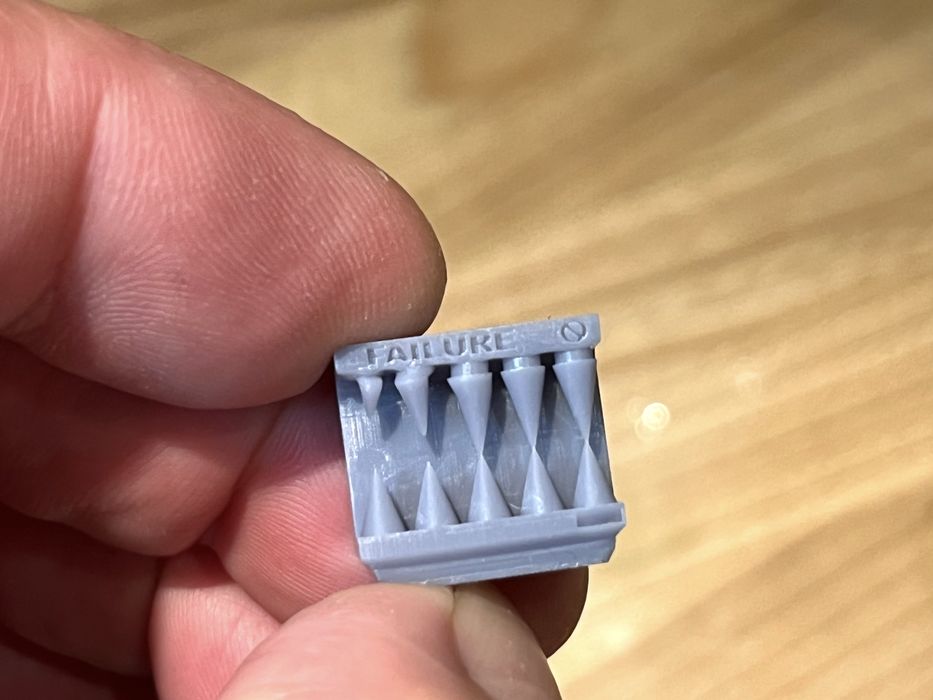
We sliced the Cones of Calibration getting an estimated print time of 00:28:46 and using 1.965 ML of resin. The completed print took much longer at 01:04:06 and showed three out of five cones in the failure side were touching, meaning that we were overexposed. To speed things up with our calibration we decided to switch over to the faster default resin profile of 0.100mm with its default exposure of 2.2s, giving us a much faster 00:10:27 for a print time. Again, we got a much longer print time than estimated slice time at 00:31:22, with three cones on the failure side touching. We lowered the exposure down to 1.8 seconds, getting an estimated time of 00:09:26 and a completed print in 00:20:49.
Once we were happy with the results of our calibration prints we loaded up the larger multi piece Star Trek Communicator model.
We got an estimated build time of 00:56:40 using 92.55ml of resin and a completed print in 01:04:58. The slicing time estimate mismatch seemed to be much less on a longer print run.
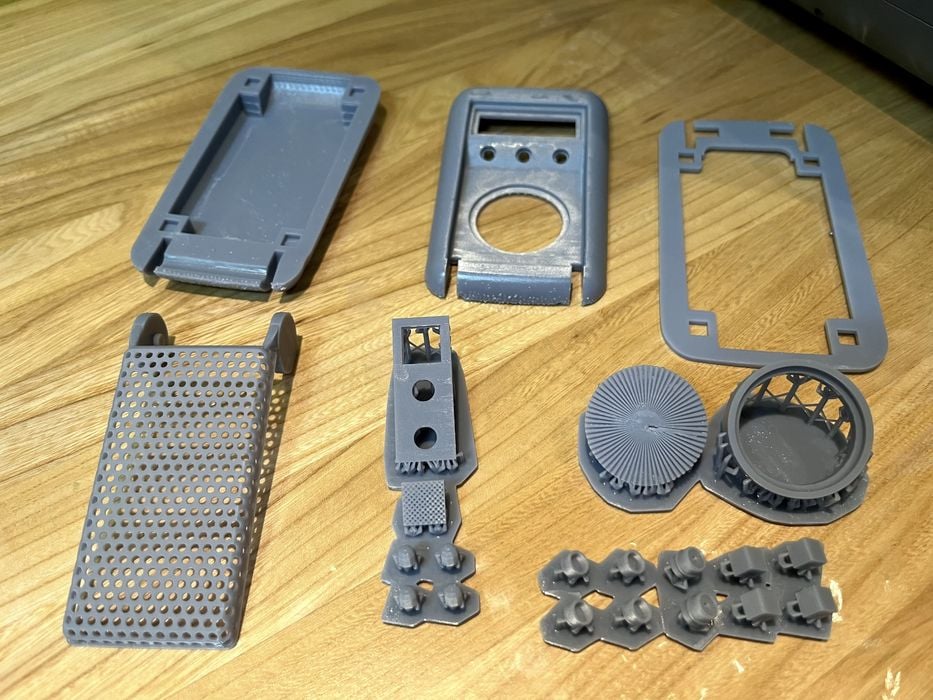
There were no issues with any of the multiple pieces that comprised the model and surface quality was excellent.
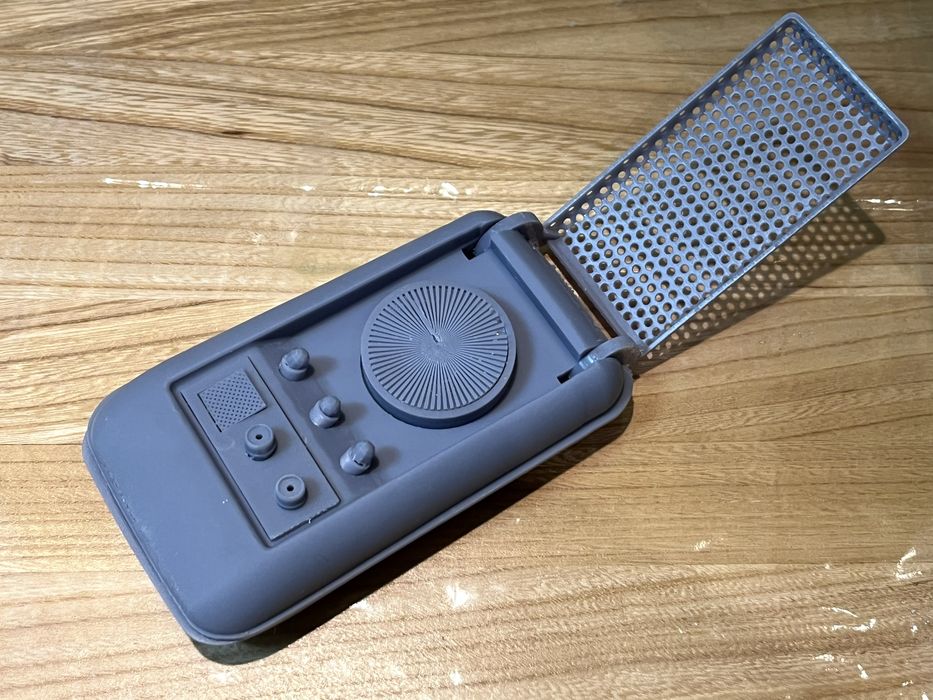
We were pleasantly surprised when all of the small parts fit together perfectly without doing any post processing! We simply removed the supports, did a wash & cure, and everything press fit together without issue. Tremendous print!
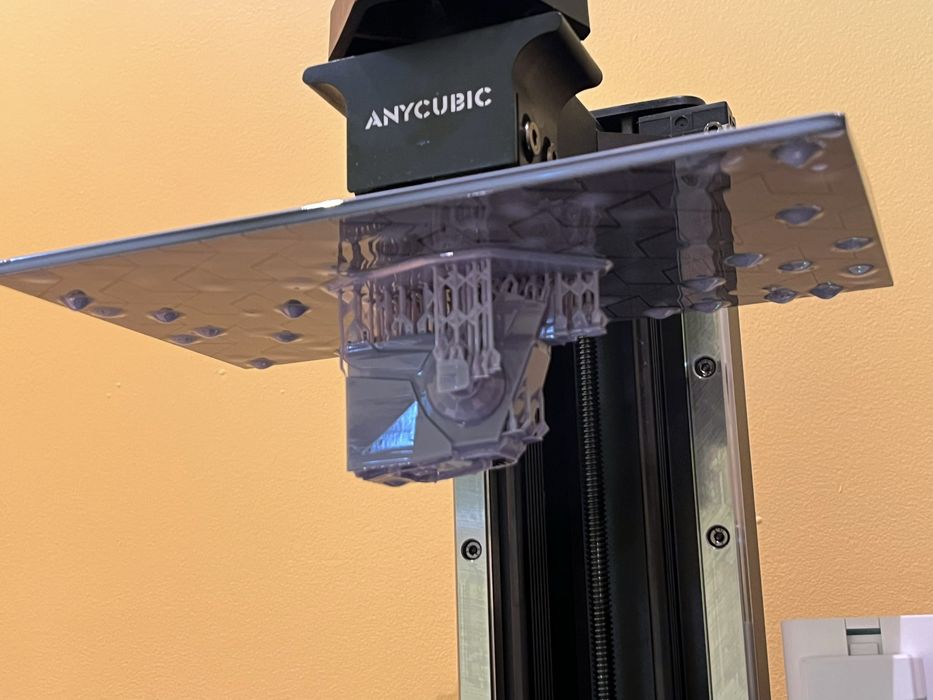
Our next print was another multipart print, AT-ST from Star Wars. When we sliced it, we got an estimated time of 00:47:58 using 75ml of resin. The print completed in 00:56:52 and said it was successful on the LCD screen, but when we lifted the printer’s lid we found we were missing the AT-ST’s head!
Because there was now possible debris in the tank and the raft for the AT-ST’s head was stuck to the FEP, we did a “Clean Tank” procedure. This involves exposing the entire print area to create a solid film that can lift out any small bits.
When we lifted up the exposed resin sheet we found just the raft for the head and no extra bits, but always best to be safe.
We prepared a new file in Photon Worksop with just the AT-ST head and increased the bottom layer exposure time to be a bit longer, slicing the file and getting an estimated build time of 00:29:50 using 24.108ml of resin.
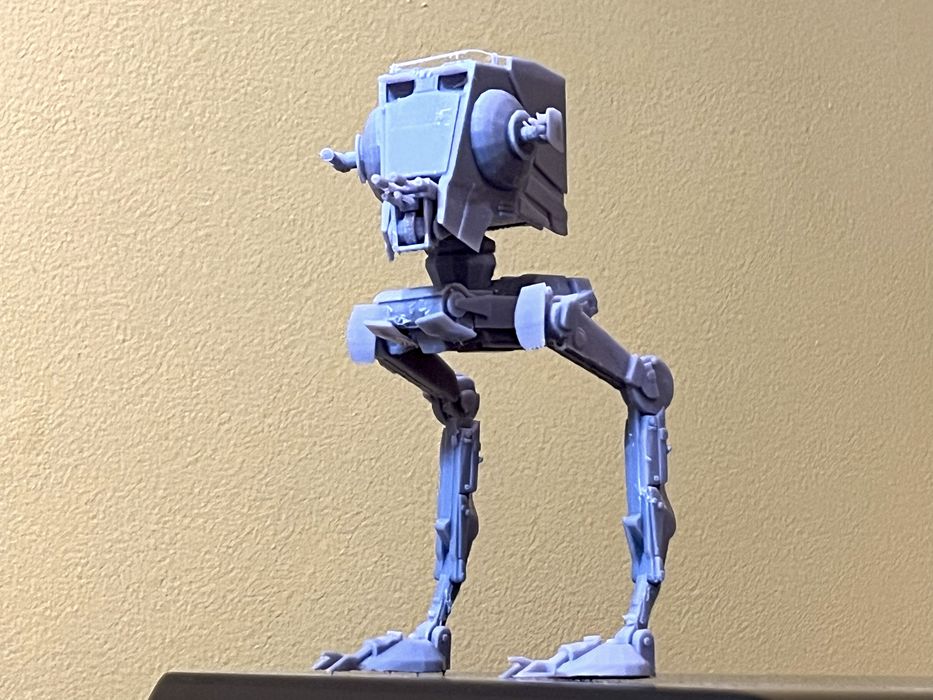
The print was successful, looked great and we were able to remove supports without damaging the model. Again, we were very pleased that the pieces of the model press fit together for demonstration purposes, without any need for post processing. Our finished model looked fantastic with the exception of a few support column scars, which incidentally look just like blast marks. This, we considered acceptable.
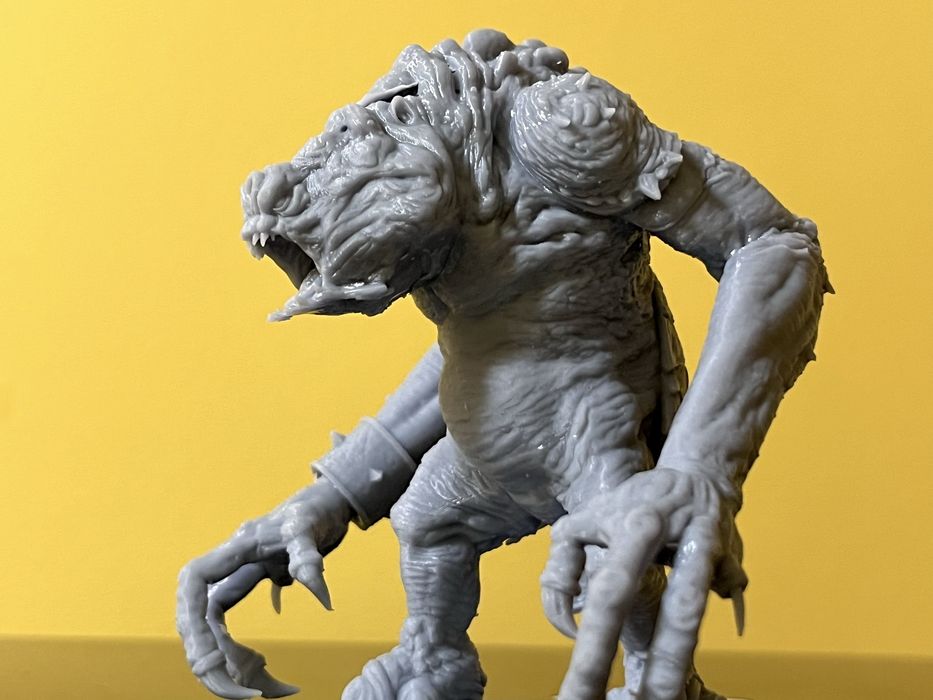
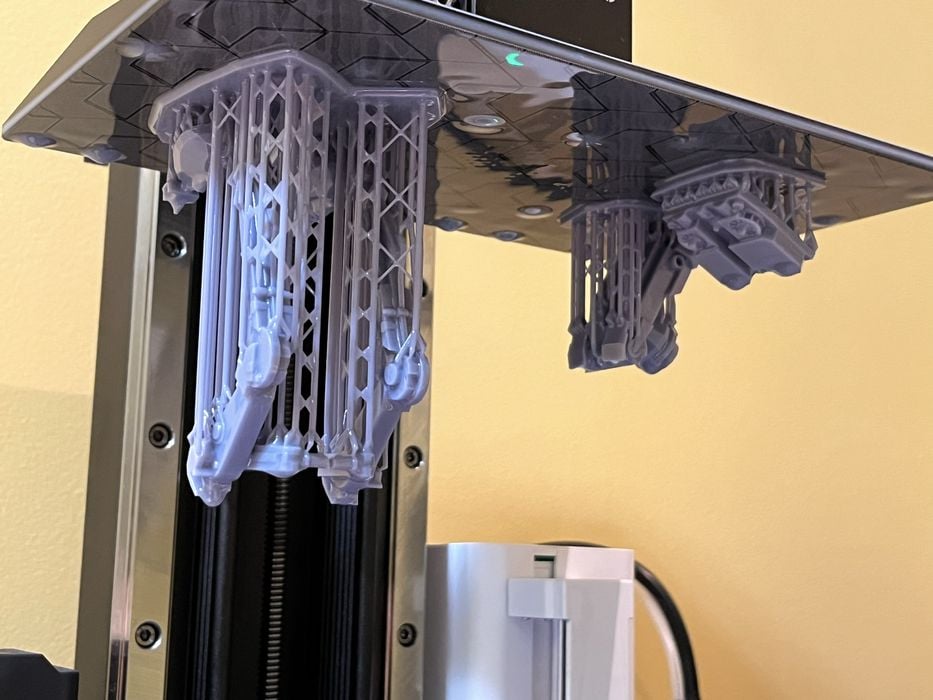
Our next print was a one piece, highly detailed statue of a Rancor monster.
We hollowed it out, rotated it, and made sure to put a few drain holes in the areas that would form suction. When we sliced we got an estimated build time of 00:55:57 using 68.98ml of resin.
Actual print time was 01:05:17 with print quality being superb, with the exception of a small layer separation at the top of the head. We checked our sliced file and found that the internal auto supports were not adequate in that area and something we hadn’t thought to check. Always check supports!
Given the added strength that comes with rigid resin, we decided to try printing the delicate Gyro Air print, with our sliced file having an estimated build time of 00:40:35 and using 48.579ml of resin.
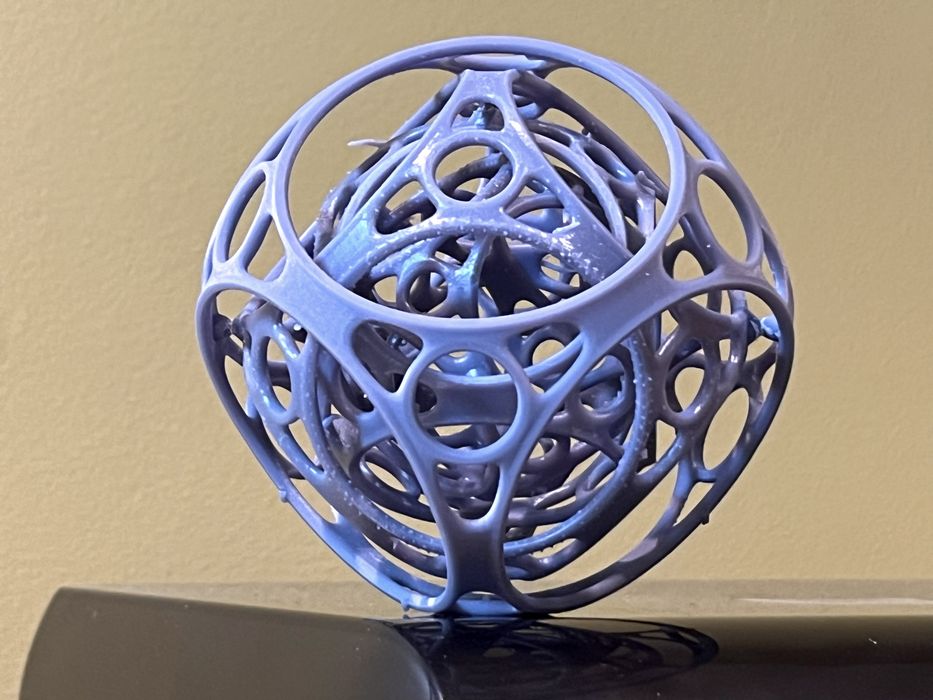
The print completed in 00:51:10 with the finish quality of the model being excellent. The rotating joints fit together and the model articulated perfectly as designed, but again we ran into several instances where the sides of support columns had collided with the model surface and embedded themselves.
A quick look through the settings in Photon Workshop came up with no adjustment to avoid this. The algorithm simply does not take the envelope of the model into consideration when placing the supports. Removal of these embedded supports was causing a lot of surface scarring.
We first noticed this issue in our last review of the M5S Pro on the Millenium Falcon model and is just something that should never happen. Of course operators could use another program like Chitubox or Lychee to generate supports and then import that file back into Photon Workshop to slice and print, but then that defeats the purpose of the slicer. Anycubic could simply fix the problem, or at the very least make profiles available for use with Chitubox.
It was time to switch over to the Bio resin for our last few prints. The Wiki did not have settings for the Bio resin, but we did find some recommended printing parameters on the Anycubic website, when we looked through the various resins for purchase. However, the settings were only for 0.05mm layer thickness.
Since we hadn’t tested that yet, we built ourselves a Bio resin profile and started with Cones of Calibration to see how close we were with our settings. We sliced the print getting 00:36:10 for an estimated time an actual print time of 01:08:14.
The print was successful with all cones passing on the success side and all incomplete on the failure side. Anycubic website states the following, “printed models using Anycubic Bio Resin are not only safe for the skin but also suitable for daily use“. With that in mind, we would only choose models that would have obvious skin contact.
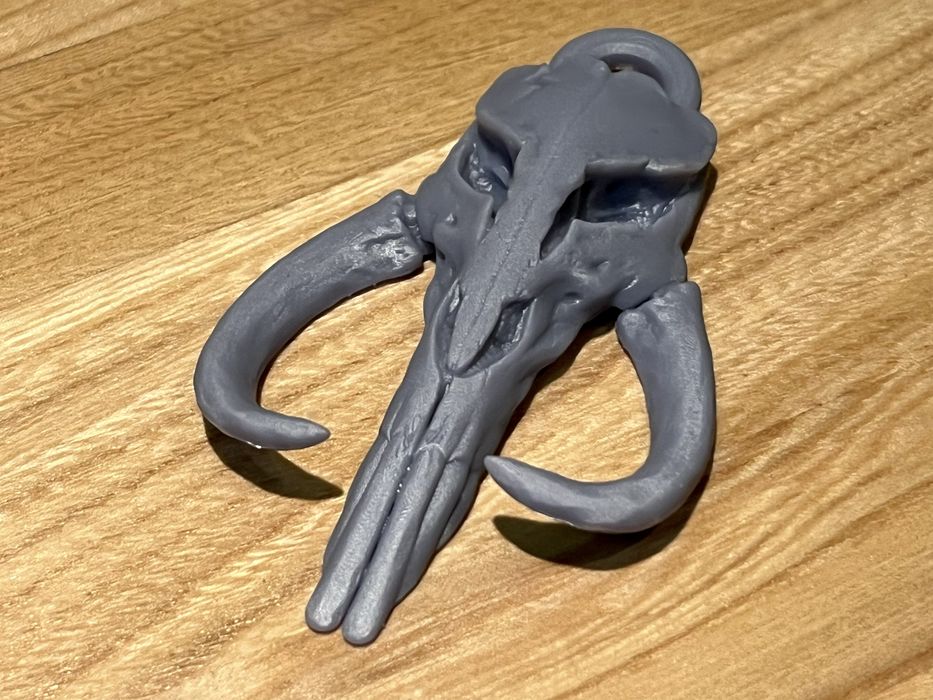
We imported Mando Necklace into Photon Workshop and sliced it with our custom 0.05mm bio resin profile, getting an estimated print time of 00:50:39 and using 11.995ml of resin. Actual print time was 01:05:20 and print quality was excellent with no defects whatsoever.
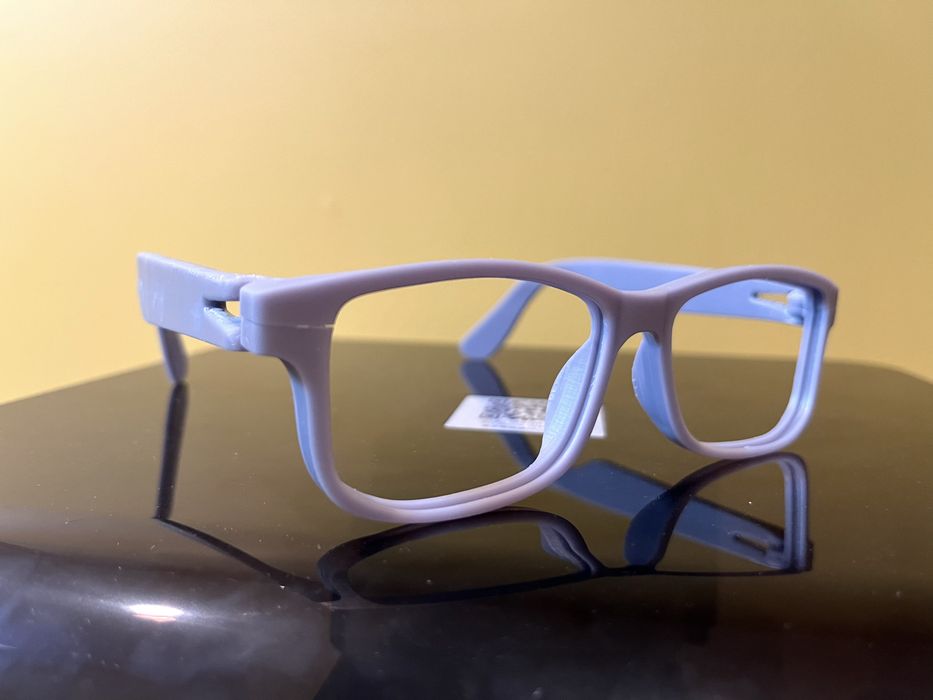
Our final print was a bit larger –– a set of eyeglass frames named Modular Glasses. The sliced file had an estimated build time of 01:54:33 using 28.948 ML of resin. Actual print time was 1:45:24 with the print quality being absolutely superb. There were no issues removing the supports, scarring was minimal and we were especially pleased when the arms snapped into place on the frames without breaking!
Anycubic Photon Mono M7 Pro Final Thoughts
As usual, Anycubic did a great job packaging the printer for shipping, from both an efficient use of space and protecting delicate components. There was no spare release film or replacement peristaltic pump tubing included, both of which are usually considered consumables and possible failure points.
Assembly of the printer was straightforward, with just a few minor inconsistencies with the on-screen guide, printed user manual and digital version. The digital user manual offered far more information about the printer, and the bonus Anycubic Wiki was available to fill in a few of the blanks we had about the printer and resin parameters. However, we went looking for the Wiki on our own, as there was no mention of its existence in either user manual.
We really liked the convenience of the leveling free build plate and the resin auto-fill unit, preferring the latter over the AirPure module, as it provided much more functionality.
The new addition of the recirculation peristaltic pump heater unit was welcome, ensuring that the resin was up to a proper temperature at the beginning of each print. We had no issues with swapping between resin types, however the pump system could pose a problem when switching between resin colors, as the few ml’s of resin remaining in the pump and tank ducting could lead to some tinting. Not to worry, the Anycubic Wiki does supply a procedure to flush the plumbing — when we found it.
Slicing models was easy to do in Photon Workshop, but the algorithm for the placement of the support columns does not seem to take the envelope of the model into sufficient consideration, and we found numerous instances where the sides of the columns were actually embedded into the model surface. We first noticed this issue during our review of the M5S Pro. Needless to say, it’s something that Anycubic should make a priority to correct, as it was the cause of much unnecessary scarring of the model’s surface.
That issue aside, the quality of prints generated on the M7 Pro was fantastic. But this wasn’t just the surface finish. It was that AND how fast these high quality prints were being completed.
Yes, we were amazed when we printed some models with high speed resin –– but the really impressive aspect was the print speeds we found with “regular speed” resin. By using Anycubic’s Default Resin Fast 0.100 layer profile, the Gyro Air print took only 00:51:10 instead of 05:17:00 on the M5S Pro. Not only did all the review prints look good, but multi-part prints simply press fit together with no post processing required. The M7 Pro seems quite good for dimensional accuracy.
The Anycubic Photon Mono M7 Pro lives up to Anycubic’s speed and precision claims and we look forward to seeing what they do next for future printer models. If you’re looking for a high speed, excellent quality resin 3D printer, the M7 Pro should be on your list.
ANYCUBIC
PHOTON MONO M7 3D PRINTER
★ BEGINNER 7/10
★ ENTHUSIAST 9/10
★ PRODUCTION 9/10
BEST FEATURES
✔︎ Resin handling
✔︎ Resin recirc & heating
✔︎ Fast printing
QUESTIONS
✖︎ Support generation
✖︎ Pump residue
✖︎ AirPure module
This is part four of a four part series, please read parts one, two and three.
Via Anycubic