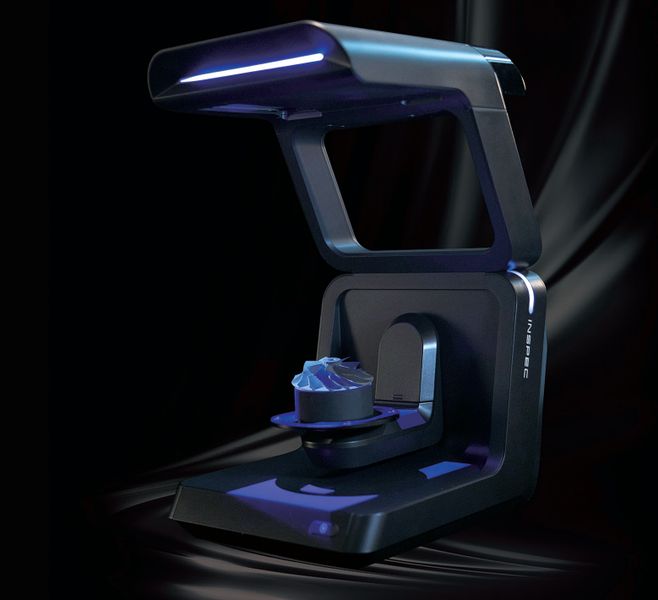
Shining 3D’s new AutoScan Inspec provides an easy way to automatically inspect 3D printed parts.
The sixteen-year-old Chinese company has established a name for itself in the 3D scanning market, having produced a number of popular handheld and tabletop 3D scanners. Their current product line is quite extensive, offering not only several types of 3D scanners, but also multiple industrial and 3D printers providing using SLA and PBF processes.
Their most recent product is the AutoScan Inspec, a “fully automated” metrology system. The problem being solved here by the AutoScan Inspec is one of quality control.
Parts being produced by a manufacturing line must be of consistent quality in all specified measures, including material, strength, thermal and chemical resistance, and, of course, dimensions.
The problem of ensuring correct part geometry is done by taking parts off the production line and measuring them in various ways. Traditional metrology involved (and still involves) a touch probe where selected surfaces of the part are touched, allowing software to generate an estimate of the part’s overall geometry.
If the part matches, or is within tolerance levels, it is considered to be a “good part”. Bad parts are removed from production, and if there are higher levels of bad parts, then adjustments must be made to the production process to reduce the quality failure rate.
Thus, production part metrology is important. While sometimes it’s done on a sampling basis from the completed parts, it can be done on every part being produced if the part is of a critical nature.
AutoScan Inspec

Shining 3D’s new AutoScan Inspec hopes to simplify this process by using 3D scanning rather than by touch probe. The obvious advantage is that virtually the entire exterior surface of the part can be modeled, rather than just estimates based on selected touch probes.
The AutoScan Inspec uses a table top 3D scanning approach, as you can see in their video:
The part is rotated during the scan, which uses the structured light approach: a grid of lines is projected onto the surface and observed by stereo-positioned cameras. The manner in which the lines appear to bend provides information sufficient to reconstruct the object as a 3D model.
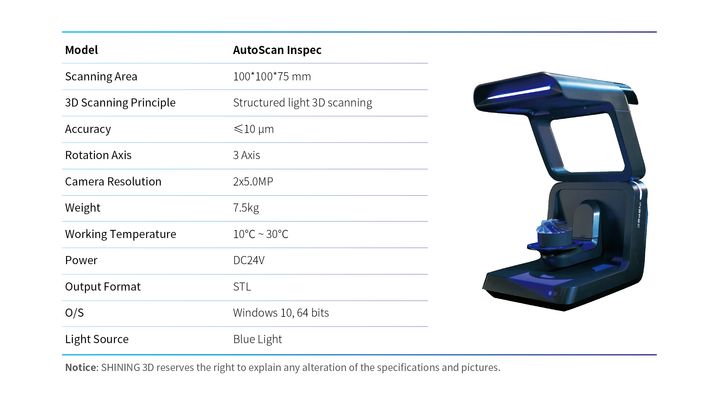
Unlike other tabletop 3D scanners that simply use a turntable to rotate the part in front of the sensors, the AutoScan Inspec has a three-axis system that can rotate the part in many different ways to ensure all surfaces are captured. However, the part will have to be hard-mounted to the three-axis platform.
Shining 3D says the AutoScan Inspec provides a very high resolution when scanning due to its onboard 5M pixel dual cameras. They say their “blue light” technology allows for an accuracy within 10μm (0.01mm) is possible.
3D scanning operations take only a few minutes to complete, as you can see in this video:
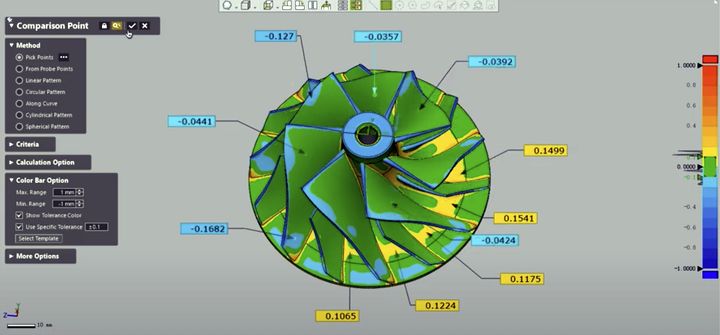
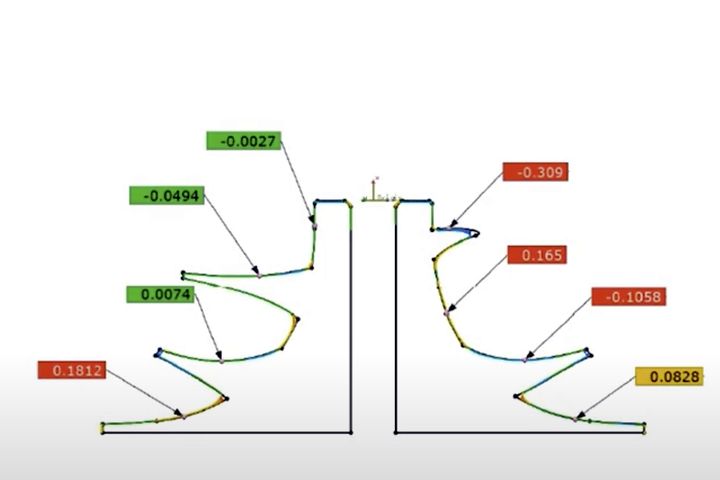
When a scan is complete, software can be used to perform a detailed inspection by comparing the captured scan to the target 3D model. If any portion of the part is out of spec, then it could be rejected.
The software is quite sophisticated, as you can see here:

Various views are available to reveal different aspects of conformity. This could be quite important when diagnosing a persistent manufacturing failure.

AutoScan Inspec also directly integrates with several popular quality control systems, including Geomagic Control X.
Perhaps the key benefit of the AutoScan Inspec is its automation. You simply place the part into the system and press a button. This simplified workflow could allow a factory to perform more quality tests on the production line in some cases.
If you’re looking for an automated metrology system to validate the quality of your 3D printed parts, the AutoScan Inspec from Shining 3D could be an interesting option.
Via Shining 3D
