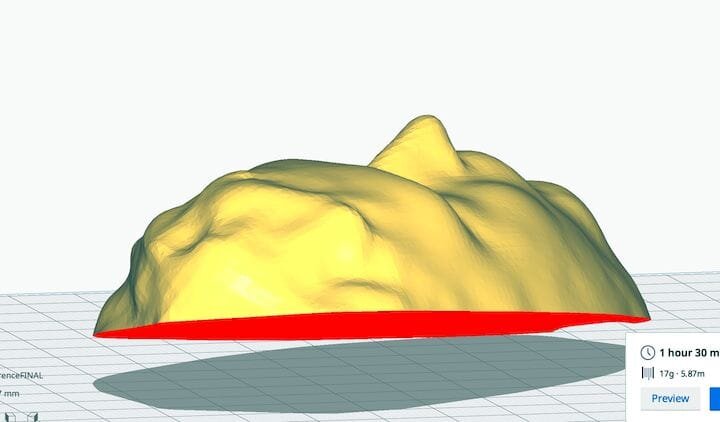
![A difficult 3D print slicing situation: how to lay this 3D model perfectly flat? [Source: Fabbaloo]](https://fabbaloo.com/wp-content/uploads/2020/05/image-asset_img_5eb08f6caedd0.jpg) A difficult 3D print slicing situation: how to lay this 3D model perfectly flat? [Source: Fabbaloo]
A difficult 3D print slicing situation: how to lay this 3D model perfectly flat? [Source: Fabbaloo]
Ultimaker has released a new version, 4.3, of their flagship software tool, Ultimaker Cura.
The software is used not only to configure 3D print jobs for all Ultimaker gear, but it’s also used frequently by many other 3D printer manufacturers as their slicing tool, too.
That’s because the software is provided as open source and is easy to modify. However, that’s rarely done as you simply need to provide a printer profile that can be input directly or imported. The ability to use plug-ins provided by others extends the functionality even further.
Now the company has released version 4.3, which isn’t actually a major release — but there was one feature that I’ve been dying for Ultimaker Cura to include.
Ultimaker 4.3 Changes
As always, the new release includes a slew of bug fixes, which are always welcome. However, Ultimaker Cura has been quite stable and if you review the numerous bug fixes most of them deal with corner cases that you likely have never and will never encounter.
Another always-found feature in new releases is the addition of machine profiles for new equipment. Kudos to Ultimaker for allowing profiles for competing equipment to be automatically included in their software. Of course, they’ve included a definition for their newly announced Ultimaker S3 device. New machine definitions (mostly provided by generous contributors) include:
-
IMADE3D Jellybox
-
Vertex Nano
-
Felix Pro 2
-
JGAurora A35
-
eMotionTech Strateo3D
-
NWA3D A31
I don’t even know what some of these machines are!
While the list of directly defined 3D printers is now quite large, version 4.3 now includes profiles for 71 3D printer manufacturers and countless device models. Older machines now unsupported by their own manufacturers are often still supported in Ultimaker Cura.
Ultimaker 4.3 Features
Let’s look at the other major feature changes in this release.
You can now directly open 3D models formatted in Collada, GLTF, OpenCTM, and PLY formats without the need for plug-ins. This will simplify the workflow for many users who must deal with those formats.
There seems to be an emphasis on increasing print quality through a series of tweaks. You can now:
-
Control the angle at which support-infill and interfaces print
-
Increase print strength by randomizing the infill start position
-
Slow down printing when small features are detected
-
Specifically select Z-seam positions
-
Limit the visibility of a joint when coasting
There’s more.
Favorite Ultimaker Feature
But my absolute favorite addition to Ultimaker 4.3 is in fact the “Align faces to the build plate” feature. This solves a continuing problem I (and likely you) have had for years: precisely aligning a non-horizontal face to the build plate.
Many times I’ve chopped larger 3D models into segments, and this typically happens on random planes not at all aligned to the print plate. Then when attempting to place them on the bed for slicing there’s always a problem because only one corner is touching. To fix you must somehow carefully rotate the 3D model, sometimes on two axes, to be close — but not exactly aligned with the print bed.
If you don’t align them properly, the job will attempt to print the object with only one small corner as the first layer, and the remainder of the print just won’t stick. Print failure!
At top you can see a pathological situation: a flat model (this one a 3D scan of Fabbaloo friend Lawrence’s face) in a near-impossible situation. You cannot easily lay this flat using manual rotation controls.
![Automatically lay a print flat in Ultimaker Cura 4.3 to any plane by clicking on that face [Source: Fabbaloo]](https://fabbaloo.com/wp-content/uploads/2020/05/image-asset_img_5eb08f6ce92e9.jpg)
However, by touching the new lay flat button on the rotate object, it automatically is laid flat and ready to be sliced.
![3D model laid flat easily using Ultimaker Cura 4.3 [Source: Fabbaloo]](https://fabbaloo.com/wp-content/uploads/2020/05/image-asset_img_5eb08f6d29831.jpg)
I cannot tell you how many times this has happened to me, particularly on other people’s 3D models where they have not properly aligned the intended print surface layer. It looks flat, but it really isn’t.
Now with Ultimaker 4.3 you need only click on any face and the model will automatically rotate and perfectly be placed on the print bed. Incredible!
Thank you, Ultimaker for this long-awaited feature!
Via GitHub

