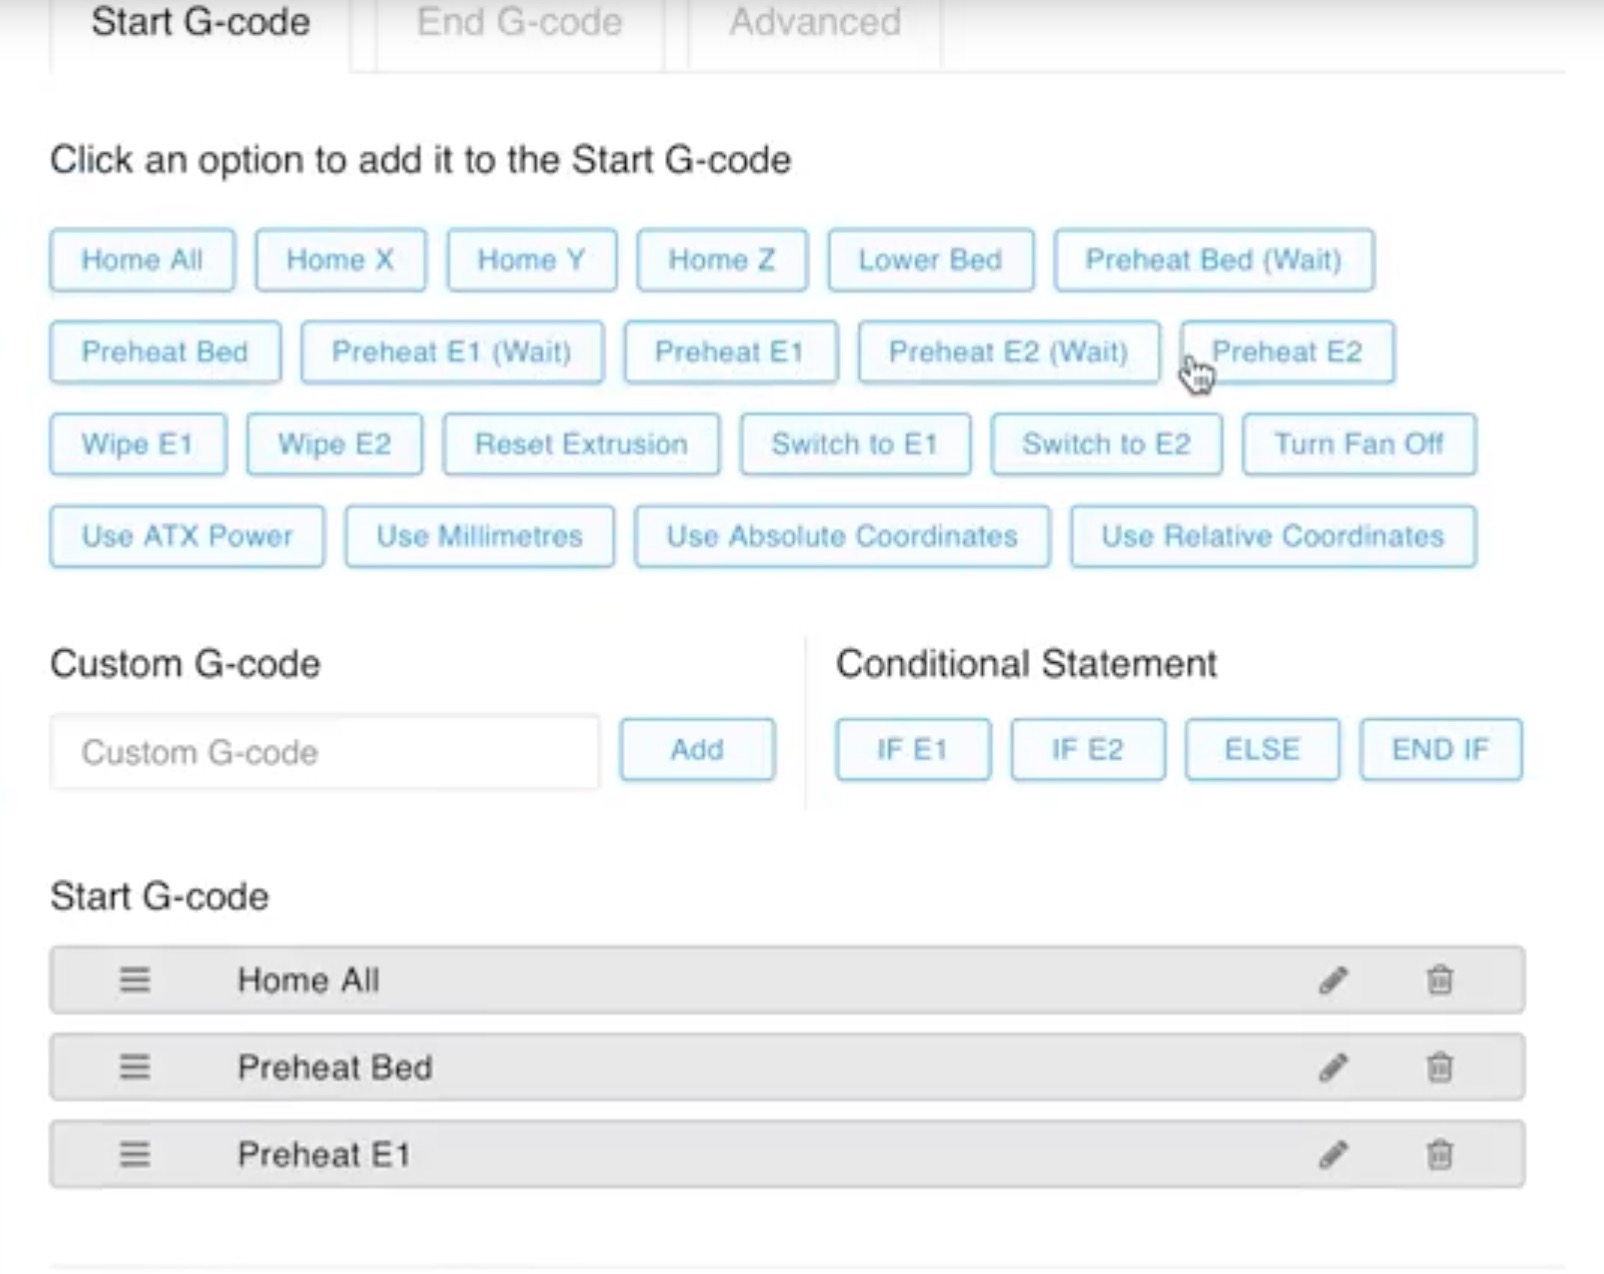
I hadn’t noticed this previously, but Printr has developed a really cool way to customize portions of your desktop 3D prints.
Printr is an Amsterdam-based company that produces a smart set-top box to make your desktop 3D printer more intelligent. The “Element” set top box is attached to your 3D printer via the USB port, and then offers network connectivity to provide easy access for control and monitoring. The system also includes a powerful slicing tool.
There are a number of such devices on the market today, and some 3D printer manufacturers are starting to build networking features directly into their equipment, but regardless, Printr has some interesting features.
One feature I noticed on their recently produced video is a new way to easily edit start and stop sequences for your device.
Let’s back up a bit. When you slice a 3D model, you are generating the “tool path” that will drive the machine for each portion of building the requested 3D model. That part is pretty standard among 3D printers.
What’s often a bit different is the beginning and ending sequences in the GCODE. These special portions of the GCODE are used for different purposes, such as heating up the print chamber, wiping the nozzle, putting the extruder away in the parked position, etc.
Typically one would edit this GCODE directly. Here’s a typical start sequence as found in Simplify3D for a MakerBot Replicator 2. Other machines have similar startup sequences:
; **** Replicator 2 start.gcode ****
M73 P0 ; enable build progress
G162 X Y F3000 ; home XY maximum
G161 Z F1200 ; home Z minimum
G92 Z-5 ; set Z to -5
G1 Z0 ; move Z to 0
G161 Z F100 ; home Z slowly
M132 X Y Z A B ; recall home offsets
G1 X-145 Y-75 Z30 F9000 ; move to wait position off table
G130 X20 Y20 Z20 A20 B20 ; lower stepper Vrefs while heating
M126 S[fan_speed_pwm]
M104 S[extruder0_temperature] T0
M133 T0 ; stabilize extruder temperature
G130 X127 Y127 Z40 A127 B127 ; default stepper Vrefs
G92 A0 ; zero extruder
G1 Z0.4 ; position nozzle
G1 E25 F300 ; purge nozzle
G1 X-140 Y-70 Z0.15 F1200 ; slow wipe
G1 X-135 Y-65 Z0.5 F1200 ; lift
G92 A0 ; zero extruder
M73 P1 ;@body (notify GPX body has started)
; **** end of start.gcode ****
While it’s entirely possible to understand what’s going on here, not everyone would be comfortable playing with this code.
This is where Printr’s new feature comes in. Using the system, you can drag and drop the standard features into a kind of “what you see is what you get” startup (and ending) GCODE sequence. As you can see in the image at top, you can simply click or drag one of the possible options into an easy-to-read sequence at the bottom. There are also conditional statements available, so you can produce a dynamic program of a sort if desired.
This is far easier to understand than the direct GCODE, although the GCODE option allows you to do literally anything possible on the machine. The Printr system is limited to the options they pre-code into the available buttons.
[UPDATE] Printr informs us that the advanced tab can be used to put in ANY required GCODE:
In the ‘advanced’ tab of the Gcode configurator, you have access to the text editor and are able to edit or add Gcode to your liking. You can even input complex formulas.
Here’s a video of how it works in practice:
Why I’m interested in this technique is that I believe the start and ending sequences are underused in 3D printing, particularly the ending sequence.
It’s possible to create a script to wait for your print surface to cool down, releasing your print. Then the script could then move the extruder to push the print off the bed – and then repeat the entire sequence over. This creates an automatic manufacturing system that can produce a large number of items for you without the need for human intervention.
I’ve seen this only in individual experiments, likely because it’s beyond the skill level or risk tolerance of many 3D printer operators. But what if such things were easy using an interface like Printr’s?
Via Printr

