
A new review maps how additive and AI could reshape wind turbine blade production, and what still stands in the way of scaling up.
The paper surveys the current state of 3D printed wind turbines across large format additive manufacturing (LFAM), fused granulate fabrication (FGF) pellet extrusion, wire arc additive manufacturing (WAAM), binder jetting for sand tooling, and photopolymer processes used for smaller components. It asks the question: is AM ready for structural blade parts, or is its value faster, and cheaper tooling?
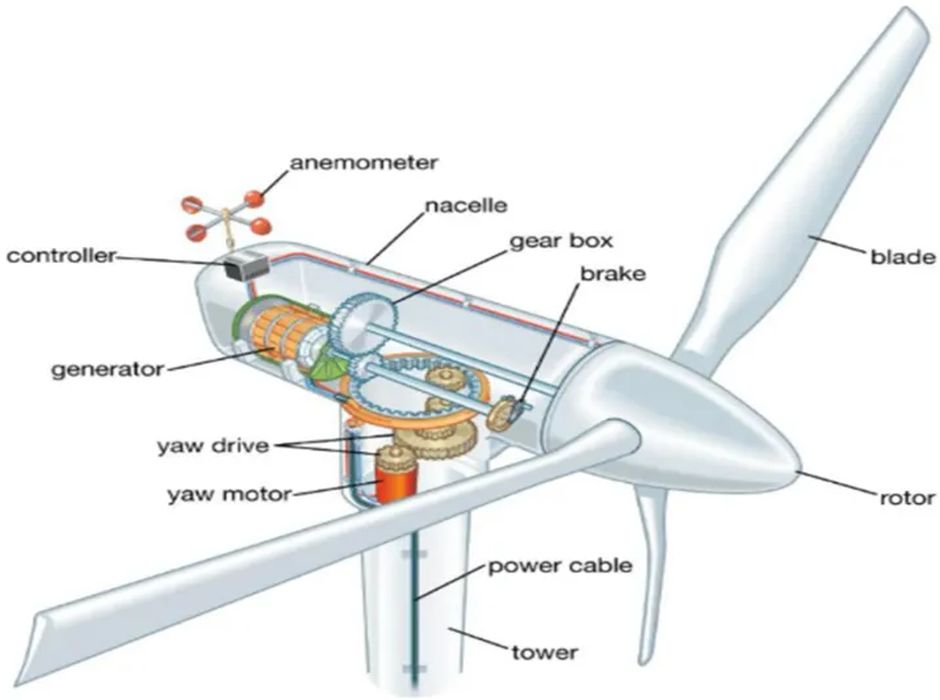
Wind blades are among the largest composite structures in serial production, with lengths now commonly beyond an incredible seventy meters offshore. Traditional manufacturing methods rely on massive molds, core kits, hand layup or automated fiber placement, infusion, long cure cycles, and extensive finishing. Additive Manufacturing might reduce tooling lead times, eliminate complex core cutting, or automate repetitive operations without compromising structural performance or certification pathways.
Where Additive Fits In Blade Manufacturing
Across the techniques reviewed, the most interesting application is tooling. LFAM and FGF platforms can print near net shape mold sections, vacuum fixtures, and trimming jigs using glass or carbon fiber reinforced thermoplastics. Some systems can deposi tens of kilograms per hour and achieve multi meter build volumes, which could meaningfully shorten schedules for new blade designs or repair tooling. Printed tools typically undergo CNC finishing, sealing, and sometimes embedded heating to meet cure and surface requirements.
Binder jetting of sand appears as a complementary path for complex foundry tooling or sacrificial mandrels, while WAAM can produce large metallic inserts, root hardware mockups, and localized tooling that demands higher temperature stability. Photopolymer processes are useful for small aerodynamic details, sensor housings, and test coupons. In all cases, the review emphasizes hybrid workflows — print large shapes quickly, then machine, coat, and assemble to final tolerance.
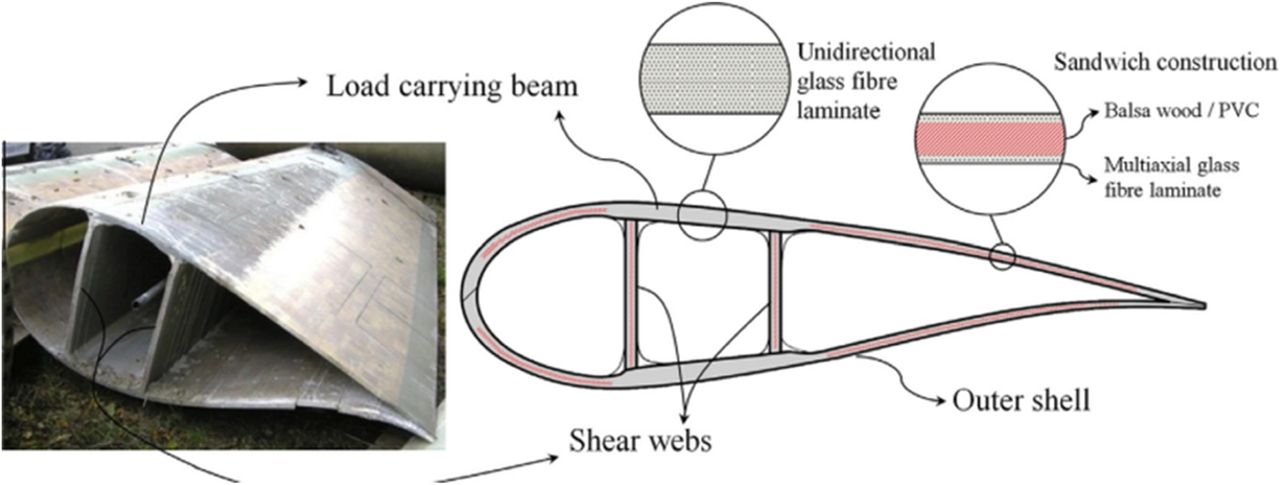
Direct printing of structural blade sections is a bit more interesting. Continuous fiber reinforced thermoplastic printing can deliver high specific stiffness in demonstrators, but current fiber volume fractions, inter-bead bonding, and long term fatigue still don’t quite match traditional laminates. Thermal management over many meters, bead placement accuracy on curved, twisted geometries, and joining printed sections into monolithic, defect free skins are challenges yet to be overcome.
AI, Automation And The Scale Up Gap
But what role does AI play here? Machine learning apparently shows promise in bead geometry control for pellet extrusion, using thermography and force sensing to stabilize width and height in closed loop. Digital twins for thermal history can refine toolpath strategies and cooling to reduce distortion. Computer vision for defect detection and automated rework triggers appear feasible on straight runs and flat webs.
However, most AI deployments in this domain are still early prototypes. Large blades really magnify data problems: maintaining calibrated sensing over tens of meters, handling occlusions around towers or spars, and synchronizing multi robot deposition on rails or gantries. Training robust models demands a huge amount of labeled data.
Economically, AM’s most important impact, according to the paper, is the time to produce tooling. Printing mold sections can cut lead time from months to weeks, for example. Material costs for filled thermoplastics compare favorably with traditional tooling boards, and printed tools can be recycled at end of life. But labor does not completely disappear; surface finish must still be done, coatings and polish steps are a lot of work, and tools must withstand cure temperatures often between 60C and 120C without creep or print through.
The authors also point out some sustainability angles. Thermoplastic tooling and cores can incorporate recycled feedstock, and AM minimizes offcut waste. That said, energy consumption for large-scale pellet extrusion and enormous heated enclosures are expensive.
There will be increasing need for wind turbines in the future as energy consumption grows, so anything that can help make that happen will be of increasing interest. One of those things will be large scale additive manufacturing.